Bananas and plantains are easy to grow in South Florida, moderately easy to grow in central Florida, and slower and harder to grow in North Florida due to freezing temperatures in winter. In the tropics, you can basically live on bananas and plantains. Ripe, they are sweet and delicious. Bananas are good off the stalk and ripe plantains are good fried, baked or roasted in a fire. If you pick bananas or plantains green, they can be peeled and boiled, added to stews, boiled and mashed into a porridge with sugar and spices or sliced and fried in oil. It’s like the best of a root crop and the best of a fruit crop. Some banana trees mature quite rapidly and produce fruit within a year of planting if well-fed and watered. Others take a bit longer. The key to bananas is regular feeding and watering. They love to sit next to seeping water. I had excellent luck running my sink drain into a stand of bananas. As denizens of the rainy tropics, bananas thrive on my water than Florida gets from the sky. It’s estimated that they like around 100 inches of water per year, which is roughly twice the rainfall Florida gets. If they are not watered, they grow slowly and may spend years without fruiting. This is what happened with the unirrigated bananas in my North Florida yard and in my parents’ South Florida food forest. Their thirstiness makes sense when you cut down a banana stalk. It’s like a huge column of water held together with tough fibers. Bananas really like to drink.
To start bananas, it is necessary to take donor plant material from an existing stand of trees. Get a sharp shovel or your trusty machete and dig out a “pup” tree from alongside the main clump, making sure you get the bulb at the bottom. Shoot for a pup that is roughly 4′ tall. Smaller pups take longer to grow and produce. If you chop off the stem and don’t get the roots, it will die. Alternately, you can chop down a larger non-fruiting stalk to a foot or so from the ground and dig out the stump, separating it from the main clump of banana trees, then plant that. Big trunk sections with a large piece of root mass are called “bull heads” and will make a few small trees that shoot up quickly and often grow faster than transplanted pups.
When you plant bananas, give them a space in full sun if possible, though they can still fruit in half sun. In North Florida, plant them along the south side of buildings or close to warm walls and water tanks so they have an easier time on freezing nights. Dig a nice hole and throw in a handful or two of wood ashes if you have them, then plant banana pups at about the same depth they were before. Some people plant a couple of bananas next to each other in each station to help create a sheltered microclimate. Plant larger banana and plantain varieties at about 8-10′ apart. Dwarf types, like the diminutive Dwarf Cavendish, can be planted at about 5-6′ apart. Mulch around the newly planted trees and don’t let the weeds crowd them or vines cover them. Feed with lots of nitrogen. Peeing at the base of the trees a few times a week is a Florida Gardening Best Practice (TM). They also like plenty of compost, some chicken manure, or high-nitrogen fertilizers. A generous sprinkling of wood ashes now and again helps provide potassium, which as we all know is one of the nutrients provided by what may be “the world’s most perfect fruit,” as the old ad put it. Alternately, you can feed them with a high-potassium commercial fertilizer. Fertilizer is marked with three numbers representing Nitrogen, Phosphorus and Potassium (NPK). If the third number (K) is high, that is what bananas like.
Bananas are not a quick crop like beans or cabbage. They will take some time to get established and start producing, often a couple of years. Once they start to make a clump and spread, the fruit will start coming with regularity and you’ll get plenty of calories for only a little work. They also like some shelter from wind. Bananas in full sun and wind in the middle of a field alone will suffer greatly. It’s better for them to have eastern exposure rather then western if they aren’t in an all-day sun location. They also love humidity, which is why it’s good to plant bananas near each other to hold in some moisture and shade the ground.
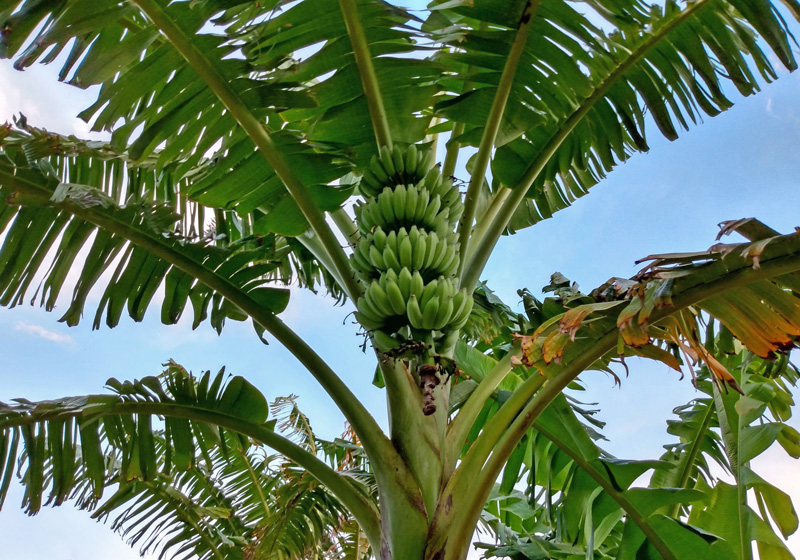
The largest stalk in a clump will go into bloom when it’s ready. A large, heart-shaped inflorescence emerges from the crown of the stalk and starts moving downward, unfurling and making bananas as it goes. The bananas are the female blooms. After the tree finishes making those, the inflorescence keeps moving down, making male blooms. These attract insects and hummingbirds but will not make bananas. When the bananas on the stalk grow nice and fat and start to turn a light dull green color, you can cut them down. Or you can wait until the first few bananas turn yellow and cut the stalk down. Once cut, the bananas will ripen rapidly – sometimes faster than you can eat them. If need be, freeze extras to store for the future. Or cook some of the green bananas as if they were potatoes and eat the ripe ones out of hand. Plantains usually need cooking to be palatable, even when ripe and yellow. I like them when they start getting black spots and are soft when squeezed. You’ll get a feel for it over time. My brother-in-law Tyler is half Puerto-Rican and he fries them before they turn sweet, cutting them into rounds and smashing them flat with a spatula in oil, getting them nice and crispy and then salting them. They are delicious that way.
Once a banana “tree” has produced a stalk of bananas, it’s done. Cut it down to the ground and chop it up to use as mulch or compost. Once it’s out of the way, other stalks in the clump will fruit and new pups will replace it. Over time, one banana tree will grow into a clump of bananas and eventually into a big stand of bananas. They will not be as productive this way, however. It’s better to cut down the big stalks after they fruit and remove all but 1-2 of the other stalks around it to encourage the plant to make more fruit rather than more stalks. You can always chop out a few pups to plant elsewhere or give away if you feel bad about paring down the clump.
Bananas love organic matter and rich soil. Florida often lacks both, so be sure to keep your bananas happy by mulching them and throwing in whatever humus-building material you have. Old coffee grounds, grass clippings, kitchen scraps – just throw them in and around the clumps to rot down. When you’re chopping down weeds or stripping vines off the fence, just feed them to the banana monster.
Another method for growing bananas is to create a “banana circle,” as I wrote about in Compost Everything:
“Permaculture enthusiasts in tropical to subtropical climates love making a specialized type of garden/compost pile called a ‘banana circle.’ The basic concept is simple: bananas crave water and are voracious feeders that love lots of organic matter. In order to hold on to water and nutrition, make a roughly yard-deep circular indentation in the ground. Angle it to trap runoff, leaving one end open to the flow of water across your property, or run a drainpipe off your roof, set up an outdoor shower or urinal, or do what I did: run the water from the kitchen sink out of the house. Around the edges of that pit, mound up the dirt taken from the center. You will be planting your bananas in the edge mound along with other plants that will benefit from the soon-to-be moist conditions and high fertility of the circle.
Where does the fertility come from? That’s the fun part! In the middle of your newly dug circle, start dumping a lot of organic matter. Chunks of log, straw, manure, kitchen scraps, chopped weeds, Spanish moss, fish guts, coffee grounds, sugarcane waste, feathers, newspapers, and whatever else you can find. Make a nice big mound; it will rot down quickly. After you’ve done that, mulch well over the bare soil, and start planting on the berm around the pile in the center. Bananas are the keystone of this design, so plant them first, and then start adding plants in between. Toward the center, where the soil will be more damp, add moisture-loving plants such as cannas, malanga, or taro. At the top of the berm, consider planting lemongrass, comfrey, sage, yacon, and other species that don’t mind it drier. On the outside of the berm, try planting cassava, chaya, squash, and other edibles. A ground cover of sweet potatoes is often recommended, as that adds one more layer of edibility to the design, and the rapidly growing vines keep weeds under control. As you plant, make sure to leave a gap in the edge of the circle so you can continue to throw organic matter on the compost heap in the center. This system will digest a remarkable amount of organic matter while paying you back in food.”
Which reminds me, I need to build another one of those where my washing machine drains. They sure grow some impressive bananas.
When temperatures drop in the fall and winter, bananas quit growing. They love days in the 80s and wet weather, but cold and dry weather makes them slow down or stop altogether. Frosts will kill the fruit and foliage and will sometimes kill the trunks right to the ground. However, this isn’t always the case. North Florida gardeners often remove all the brown leaves or chop the trunks off after a freeze, making the plants regrow from lower down. I do not recommend this! If it’s winter and you get a freeze that toasts your banana trees, just leave them alone. I don’t care how ugly they look – leave them alone until spring. The dead leaves will help keep the remaining trunks warm in case of a further freeze. In spring once the danger of frost has passed, you can go ahead and take off the dead leaves but don’t attack the trunks right away. Wait and see what happens. Often, a new leaf will emerge from the top and the tree will keep on growing. If you chop it all down to make it look nice, you won’t get fruit as quickly. If the trunks get rotten and start to collapse, go ahead. Otherwise, wait and see. An exception is if a stalk was already blooming when Jack Frost arrived. If the bloom and/or young bananas are toasted, cut the whole stalk down – it’s done. You’ll have to wait for the next “tree” to produce.
This is just a small piece of Florida Survival Gardening, available now in Kindle and Paperback.